Reconciling Starts With the Records: Which Binance Export to Pick and How to Download It
Working out your cost basis and tracing where money went call for different reports. This note lays out the entry points, steps and monthly limits for both exports on Binance's website, and how to reconcile once you have the CSV files.
Binance's website has two export entry points, and they give you two different reports. One is the spot trade history statement, which only covers the trades where you actually bought or sold. The other is the statement you export from Asset History, in effect a ledger of every event that changed your balance. To work out your own cost basis, download the first; to trace where a sum of money came from or went, download the second.
First, what the two have in common: both are requested and generated on the website, both notify you once they're ready, both come as CSV files (CSV is the plainest spreadsheet format and opens in Excel, Numbers or a spreadsheet app on your phone), both download links last only 7 days, and both have a cap on how many you can generate each month. Below we go through it in this order: which one to pick → how to download it → where people get stuck → what to do with it afterwards. The relevant wording from the two Binance Help Center pages sits next to the sentences it supports.
Work out which report you need first
Two help pages cover this. One is How to Download Spot Trading Transaction History Statement? (accessed September 2026), which begins: “To help you keep track of your spot market crypto trades, you can generate an annual transaction report of your Binance spot trading history.” The key words are spot, trades and annual: it covers buying and selling only, one year at a time.
The other is How to Generate Transaction History? (accessed September 2026). What it exports is a statement of your whole account (we call it the asset history statement here, after the Asset History menu it lives under), and the way in is tucked away inside Asset History. Its scope is far wider: deposits, withdrawals, transfers, Earn payouts, trades — anything that has moved your balance, listed in time order.
So which one you pick depends on the question you want answered. “What did I pay, on average, for the coins I hold?” — download the spot trade history statement. Cost basis depends only on fill price, quantity and fees, and every other kind of record just gets in the way. “Money is missing from my account; where did it go?” — download the asset history statement, because that money very likely wasn't a trade at all but a transfer or a withdrawal. If you want both, download each once; they don't get in each other's way.
Spot trade history statement: six steps to a CSV
The whole thing is done on the website, and the help page splits it into six steps. Step one, in the page's own words: “Log in to your Binance account, click the [Profile] icon and go to [Orders] - [Spot Order].” Step two: “Click [Trade History] - [Export Trade History].” Make sure you're on the [Trade History] tab at this point.
Step three sets the time range: “Select [All Time] and click on the calendar bar to adjust the dates. You can download up to a full year’s trading history from the selected date after 2017-07-13.” Step four: “Click [Generate].” You don't need to sit on the page after submitting; step five says “After the statement is ready, you will receive a notification.” Step six: “Click [Download] to save it in a CSV file.”
While we're here, a quick word on two terms beginners often mix up (this is our own explanation, not an official definition): an order is what you place, and it may fill or you may cancel it; a trade is when something actually changes hands. Record-keeping goes by trades. The end of that Binance page also links to a separate page on the difference between Order History and Trade History, if you want to dig deeper.
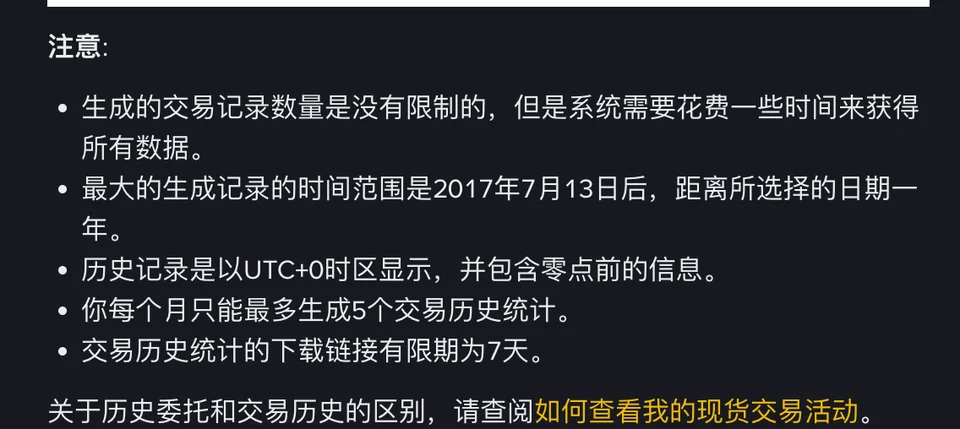
Four limits to know before you export
The note in the screenshot above has five points. First, the four hardest limits:
- One year per statement, at most — “The maximum range for each statement generated is one year from the selected date after 2017-07-13.” If you've let your records pile up for several years, export them one year at a time.
- Nothing earlier than 2017-07-13 — records from before that date aren't available through this entry point.
- 5 statements a month — “You can only generate 5 statements per month.” So get the time range right the first time instead of spending your quota on trial runs.
- Links expire after 7 days — “The statement download link will only be stored for 7 days.” Save the file to your own device or cloud storage; once the link has expired, the only way back is to generate a new statement and use up another slot.
One more point isn't a limit, but it's more likely to make your numbers disagree: “The history is shown in UTC+0 and contains information before 00:00.” The times in the file are in universal time, not the time shown on your phone. Say your time zone is UTC+8: orders you placed in the small hours, local time, will land on the previous day in the report. If a month-by-month reconciliation is off by a trade or two at either end, think time zone before you suspect anything else.
Asset history statement: the time range is the key step
This one isn't under your orders; it's under your assets. Step one on the help page: “Log in to your Binance account go to [Assets] - [Asset History].” Step two: “Mouseover the export icon and click [Export Transaction Records].” The page specifically says to hover first and then click, because the menu only appears when you hover.
Step three is the time range, and there are two routes. For anything within the past 6 months: “Select from the ranges provided and select from the account, sub-account and Coin options you would like to generate the statement for. Click [Generate].” A sub-account is a separate account opened under your main account; if you've never deliberately set one up, you only have the main account and can leave the default. For anything beyond 6 months: “click [Customize] and select the custom date range for your report. Then, click [Generate].” What this report adds compared with the trade report is those three choices — account, sub-account and coin — so select everything that applies to your situation rather than just leaving the defaults.
Then you wait. The page says “Generating the report will take some time, and the time remaining will be displayed under the ‘Status’ column.” When it's ready you'll get an SMS and/or email, and the page adds: “If you do not receive the reminder message, please wait and check back in one to two hours.” The reminder can be delayed or blocked, so don't rush to generate another statement and waste a slot. Finally, go back to the [Export Transaction Records] pop-up and click [Download] next to the statement that was generated. This link, too, expires after 7 days.
The page also points out: “To export records from different timeframes, you may need to request for the export multiple times, each report one-by-one.” If one export can't cover everything, split it into several; don't expect a single file to hold your entire history.
What to do once you have the files
The two files let you check one against the other: every buy and sell in the trade report should have a matching balance change in the asset history. For rows that appear in the asset history but not in the trade report, check whether they are transfers, deposits, Earn payouts and the like — those only ever show up in the asset history.
For your own records you don't need to copy the whole file. What you'll actually use is the trade time, trading pair, buy or sell, price, quantity and fee; copying those into your own spreadsheet is enough. As for what each column is called and where it sits, go by the actual headers in your file, since Binance can change the format at any time.
Once you have the numbers, working out your cost basis is a separate job. After buying in batches, what is your cost basis really? goes into more detail than this note; the key point is that fees taken off when you buy have to be counted. For why the fee differs from trade to trade and how maker and taker differ, see how trading fees work and how to pay less.
One more thing worth doing while you're at it: these files hold your complete trading record, so think about who could see them before you put them in cloud storage or on a shared computer. Don't neglect the account's own protection either; setting up 2FA, anti-phishing and a withdrawal whitelist is something you do once and then stop worrying about.
When you don't need to bother
If you've only made one or two buys and put in a few hundred USDT in total, scrolling through the records on the exchange page is enough, and exporting just creates extra work. Exporting really pays off when you have more records than you can scroll through on the page, or when you want to move the data into your own spreadsheet and do the math there.
Taxes are a different case. The How to Generate Transaction History? page opens with: “If you need to file taxes for your cryptocurrency investments, you can generate a statement of your Binance account to perform tax calculations.” What it gives you is data, not tax rules. Rules vary widely from place to place; whether and how to report is a question for a qualified professional where you live, and this note doesn't go into it.
A final word on timing: if you wait until you actually need the files, you may find the month's quota already used up, or the link already past its 7 days. If you have records you'll need to reconcile, download each report once while you still have quota and save them; the number-crunching can wait.
This site keeps Binance referral links only in selected step-by-step guides. If you sign up and trade through one of our links, any benefit for you depends on the platform's current promotion, and it does not change what we write. We are an independent third-party information site, not the official Binance website. The entry points, quotas and link lifetimes in this article follow the Binance Help Center as of September 2026, and the platform may change them at any time. Crypto prices swing hard and you can lose your entire stake. This is for education only and is not financial advice.